pytorch(2) tensor control
Introduction
이 포스팅은 Pytorch에서 많이 다뤄지는 텐서의 기본적인 지식과 텐서를 효과적으로 다루기 위한 방법을 기록하였다. 내용은 파이토치 튜토리얼과 네이버 ai 부스트캠프를 참고하였다.
Pre-question
- 파이토치에서 view, reshape, squeeze, unsqueeze는 어떤 용도로 쓰일까?
텐서의 의미
Pytorch에서는 텐서를 사용해서 모델의 입력과 출력 및 매개변수들을 encoding한다.
Numpy의 ndarray와 유사하며, Automatic differentiation (Autograd) 에
최적화 되어있다.
기본적으로 필요한 모듈은 다음과 같다.
import torch
import numpy as np
또한 Pytorch에서 텐서를 다루는 것은 numpy 구현 문법과 매우 비슷하나 일부 다른 부분이 있다. 이는 뒤에서 설명한다.
텐서의 사용
텐서 초기화
- 데이터로 부터 직접 생성
data = [[1,2],[3,4]] x_data = torch.tensor(data) - Numpy 배열로 생성
from_numpy를 이용한다.np_array = np.array(data) x_np = torch.from_numpy(np_array)다른 예시인데, 아래와 같이 numpy를 정의하는 것과 tensor를 정의하는 것을 같이 확인해보자.
# numpy 정의
import numpy as np
n_array = np.arrange(10).reshape(2, 5)
print(n_array)
print("ndim :", n_array.ndim, "shape: ", n_array.shape)

# torch의 tensor 정의 방식
import torch
t_array = torch.FloatTensor(n_array)
print(t_array)
print("ndim :", t_array.ndim, "shape: ", t_array.shape)
- 다른 텐서로 생성
ones_like, zeros_like, rand_like 등을 사용한다.
x_ones = torch.ones_like(x_data)
# 속성을 override.
x_rand = torch.rand_like(x_data, dtype=torch.float)
- 상수값 사용
shape = (2,3,)
ones_tensor = torch.ones(shape)
텐서 속성 확인.
tensor에는 shape, dytpe, device 등 다양한 attribute가 있다. dir(tensor)로 가능한 속성을 확인할 수 있다.
tensor = torch.rand((3,4))
print(f"Shape : {tensor.shape}, DataType : {tensor.dtype}, Device : {tensor.device}")
텐서 연산
pytorch는 여러 텐서 연산을 지원한다. 링크
to 연산 : 연산 장치 할당
각 연산들은 CPU는 물론 GPU에서 실행할 수 있다. 어떤 장치로 연산을 할지 할당하기 위해 .to 메소드를 사용할 수 있다. 보틍은 nn.module 상속한 모델을 만들어서 모델에 직접 .to을 적용한다. 그러나 여기서는 텐서를 GPU 연산에 할당하는 방법만 확인해보자..
import torch.cuda
x_data.device
# device 속성은 해당 텐서가 어떤 장치를 사용해 연산하는지를 나타낸다.
# cpu라면 오른쪽 처럼 출력된다 : device(type='cpu')

if torch.cuda.is_available()
 x_data_cuda = x_data.to("cuda")
x_data_cuda.device
# device(type='cuda', index=0)
인덱스와 슬라이싱, stack, unstack
아래와 같이 인덱싱과 슬라이싱도 numpy처럼 사용할 수 있으며, cat, stack을 이용해 합칠 수 있다.
tensor = torch.ones((4,4))
print(f"First row:{tensor[0]}, First col:{tensor[:,0], Last col:{tensor[...,-1]}")
# cat 함수 : 차원수는 그대로 하되, 특정 차원(dim)의 요소를 concat
# 아래의 결과로는 (4,12)의 shape를 가진 텐서가 나옴.
print(torch.cat([tensor, tensor, tensor], dim=1))

# stack은 dim으로 설정한 차원을 추가한다.
# 아래의 결과로는 (4,4,3). dim=1이면 (4,3,4)
print(torch.stack([tensor, tensor, tensor], dim=1))
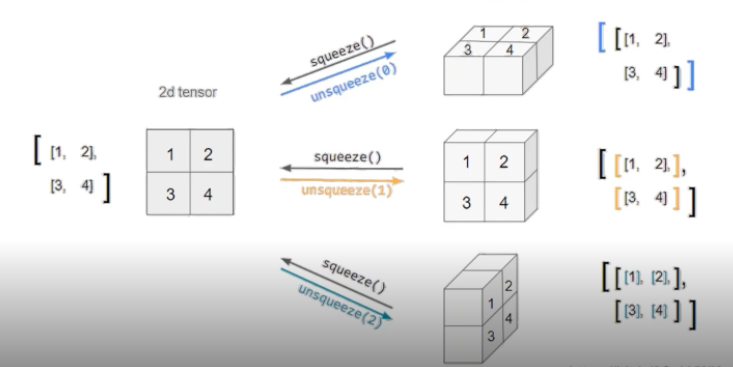
squeeze, unsqueeze : 차원 축소/확장
데이터값 변경 없이 차원을 축소하거나 확장하는 squeeze, unsqueeze가 있다.
- squeeze : 차원의 개수가 1인 차원을 삭제 (압축)
- unsqueeze: 차원의 개수가 1인 차원을 추가
view, reshape : 텐서의 shape 구조 변경
아래 예제 코드를 확인해보자.
tensor_ex = torch.rand(size=(2, 3, 2))
tensor_ex
# view, reshape 둘다 텐서의 차원 구조를 변경한다.
tensor_ex.view([-1, 6])
tensor_ex.reshape([-1,6])
a = torch.zeros(3, 2)
# 차이점으로 view는 보는 shape만 다르게 하고 참조 데이터와 같은 메모리를 공유한다.

b = a.view(2, 3)
a.fill_(1)
b
# tensor([[1., 1.],
#        [1., 1.],
#        [1., 1.]])

# 그러나 아래와 같이 reshape 경우는 메모리 공간을 반드시 공유하지는 않는다.
a = torch.zeros(3, 2)
b = a.t().reshape(6)
a.fill_(1)
b
# tensor([0., 0., 0., 0., 0., 0.])
##두 텐서간의 산술연산
element-wise product는 *또는 mul, 매트릭스 곱셈은 @이나 matmul 또는 mm을 사용한다.
mm과 matmul은 연산은 동일하지만, broadcasting 지원에 차이가 있다.
matmul은 broadcasting을 지원하나 mm은 지원을 안해준다.
근데 broadcasting이 결과를 헷갈리게 할 수 있으므로 mm이 권장되기도 한다.
# matrix multiplicaton
y1 = tensor @ tensor.T
y2 = tensor.matmul(tensor.T)
out = torch.matmul(tensor,tensor.T)

# element-wise product
z1 = tensor * tensor
z2 = tensor.mul(tensor)
out = torch.mul(z1, z2)
참고로 벡터간 내적을 구하려면 dot을 쓸 수 있다.
single-element 연산, 텐서의 요소값이 하나로 aggregate된다.
agg = tensor.sum()
# item()을 사용해 python 숫자값으로 변환가능.
agg_item = agg.item()
print(agg_item,type(agg_item))
Numpy bridge
CPU상에서 텐서와 Numpy 배열은 메모리 공간을 공유하므로, 하나가 변경되면 다른 하나도 변경된다.
t = torch.ones(5)
n = t.numpy()
# in-place 연산
t.add_(1)
print(f"t:{t}, n:{n}")
# 새로 할당할 경우에는 결과가 다름.
t = t.add(1)
print(f"t:{t}, n:{n}")
탠서 조작 시 주의할 사항
contiguous
모델 입력 차원을 맞추기 위해 텐서의 차원을 조작하다보면, 텐서 성분의 기존 메모리 저장 순서와
처리되는 텐서 구조가 좀 달라지는 경우가 있다.
자세한 것은 아래를 참조. 이를 주의하여 view, reshape, transpose들을 사용하여야 한다.
[contiguous 원리와 의미] (https://jimmy-ai.tistory.com/m/122)
nn.functional 모듈
딥러닝에서 유용하게 쓸 수 있는 다양한 함수를 지원한다.
import torch
import torch.nn.functional as F

tensor = torch.FloatTensor([0.5, 0.7, 0.1])
h_tensor = F.softmax(tensor, dim=0)
Autograd
PyTorch의 핵심은 자동 미분의 지원이며, backward 함수를 사용해 자동 미분을 경험할 수 있다. 아래 requires_grad를 True로 하면, 해당 파라미터의 grad 값을 구할 수 있다.
w = torch.tensor()(2.0, requires_grad=True)
y = w**2
z = 10*y + 25
z.backward()
w.grad
물론 이렇게 텐서 단위로는 보통 안하고, 모델 수준에서 autograd라는 함수를 그냥 사용한다. 왜냐면 이미 torch에서 모듈로 구현된 레이어 내부에서 requires_grad가 이미 true로 세팅되어있기 때문이다.
기타 조작 함수
선형 대수를 포함해 매우 다양하고 많은 tensor 조작 함수가 있다. 본 포스팅에 나온 내용 이외에도 눈여겨볼만한 함수들을 기록하였다.
- gather 함수
https://pytorch.org/docs/stable/generated/torch.gather.html#torch.gather
out[i][j][k] = input[index[i][j][k]][j][k] # if dim == 0 out[i][j][k] = input[i][index[i][j][k]][k] # if dim == 1 out[i][j][k] = input[i][j][index[i][j][k]] # if dim == 2 - scatter 함수
https://pytorch.org/docs/stable/generated/torch.Tensor.scatter_.html#torch.Tensor.scatter_
self[index[i][j][k]][j][k] = src[i][j][k] # if dim == 0 self[i][index[i][j][k]][k] = src[i][j][k] # if dim == 1 self[i][j][index[i][j][k]] = src[i][j][k] # if dim == 2 -
expand 함수 https://pytorch.org/docs/stable/generated/torch.Tensor.expand.html?highlight=expand
-
check 함수 https://pytorch.org/docs/stable/generated/torch.chunk.html#torch.chunk
-
swapdims 함수 https://pytorch.org/docs/stable/generated/torch.swapdims.html#torch.swapdims
-
랜덤 샘플링 함수 https://pytorch.org/docs/stable/torch.html#random-sampling
- einsum 함수 https://pytorch.org/docs/stable/generated/torch.einsum.html#torch.einsum
Reference
- https://tutorials.pytorch.kr/beginner/basics/quickstart_tutorial.html
- 네이버 AI 부스트캠프